Le blog de Sécham » C'est beau, c'est simple, Sécham.

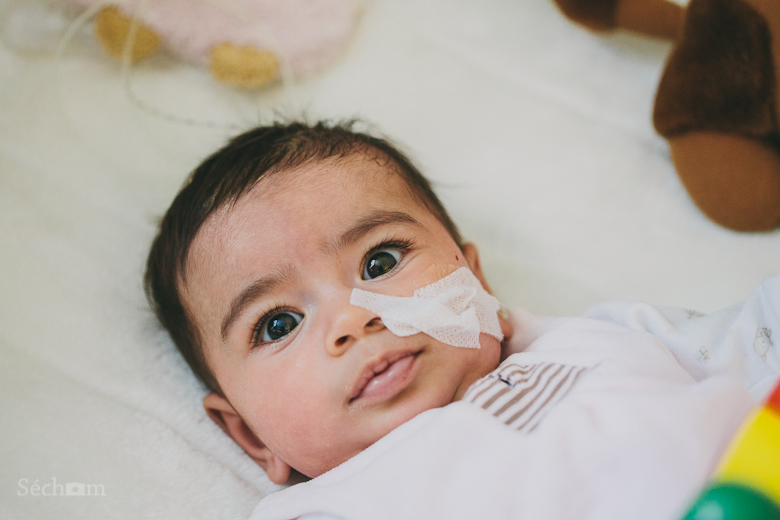
After two posts purely about photography I thought it was time to give my readers some news about us and especially Ketsia. Parenthood is still a great challenge for Lisa and me but it’s also a marvelous challenge. You really see how Ketsia is « growing »: she is making more noise, new noises, grabbing a lot of things, she wants to taste everything,she discovered she could push herself with her feet in order to get new degrees of freedom, and she is finally getting weight. We were quite a little bit worried about Ketsia’s growth but as we adapted her food and thanks to the feeding pipe, that you can still see on the pictures, she correctly puts on weight. She can also drink a good quantity of milk by herself.

Ketsia’s condition is still challenging us but gives us also a lot of joy. It is like to be in a « waiting »-mode. When people ask us how we are doing? We can answer great but we cannot say that everything is okay. There are still some small problems in her heart and these small problems do cost her some strength. There is also the feeding pipe. One the one hand it is a complicate process because feeding Ketsia takes quite a long time, people are sometime staring at her in a strange way, but in the other hand it really helps Ketsia to grow.
So I beg your pardon when we are saying that Ketsia is doing « okay » because sometimes we do not really want to explain the whole situation again and again, but we do not want to lie because there are still « problems ». The only thing we want is to enjoy the time we have and be thankful for it. This thankfulness is also really important for Ketsia. Despite the fact she could have a « normal » life once, she will be always different and will always have that special heart (her chest wears its mark). This difference should be a reason to rejoice because she’s made it so far and we are pretty sure that transmitting her this thankfulness will make her even stronger. Thanks again for you prayers that are also making her/us stronger and don’t get me wrong, we are always glad when you ask about Ketsia.

To finish this post I would like to share you some photos from a late afternoon winter walk that we had in the snowy Rijswijk. It may be the last walk in the snow for a long time as positive temperatures are announced in the coming days. It was really pleasant. We really enjoy living in the old city center of Rijswijk. It has a special flair. Ketsia could also enjoy some new perspectives in order to not just stare at the sky when we are going out. Enjoy the pics

Shortly for « Play with Light » purpose: the photos of the winter walk were taken with a 100m 2.8 macro Lens. I would call that lens a « details »-lens but I would write a little more about it in an other post ;o)

  • miniz tata - counting down: 17 days to go!!!!!! Toujours aussi fan de mon petit coeur 😉
    gros gros bisous à tous les 3 et un spécial pour Ketsia!
    merci pour les photos et à très bientôt <3<3<3ReplyCancel

  • Guillaume - C’est vrai qu’elle a bien grandi en deux semaines 🙂 C’est impressionnant 🙂 Alors j’imagine même pas le choc à la fin du mois de mars 😉ReplyCancel

In the last post we spoke about exposure which will then depends on your aperture, your shutter speed and your iso. I wrote also about the « correct exposure » which should be obtained when the cursor of the light-meter is in the middle of the scale.
In this post I would speak more in the direction of the « right » exposure. I use the word « right » because by choosing our settings we want to achieve a result in purpose. This is where your light-meter and the metering modes become important.

In order to make it easier to understand I would take the example of a subject in back light. I really like pictures with back light. When I started to play with my DLSR I was always amazed by such pictures where the sun is in the back of the subject and you can still recognize the subject. Most of my pictures were at the beginning a beautiful blue sky and a really really dark gray subject. I am sure you know these pictures. Of curse, it can also be great to just detach the silhouette of your subject and see a beautiful black shadow on a beautiful blue sky.
To achieve such extreme results, the understanding of metering modes and light-meter is really helpful.

There are 4 metering modes:
– Evaluative metering (point with 2 semicircles around): the brightness is metered on all the picture. It is the basic mode of metering.
– Partial metering (2 semicircles): the brightness is metered in the center plus a small peripheral zone of the center. Really helpful with backlit subjects.
– Spot metering (point): the brightness is metered in the center of the picture (more selective than the partial metering mode).
– Center-weighted average metering (nothing): the brightness is metered on all the picture but the center zone has more influence than the peripheral zone. It like an hybrid between the evaluative and the partial metering.

I know that such theory is not really speaking that is why I want to show you now some small pictures. As I live in the Netherlands I chose a tulip as subject. I put it in front of a light to simulate the back light configuration. I had also another light to enhance a little bit the color of the flower. I was using my 100mm 2.8 lens, put the camera in the Av-mode to f4.0 and 400iso. The camera will then determine the shutter speed itself in order to reach the correct exposure. I just changed the metering modes. The pictures is centered on the tulip.

Spot metering

The camera chose a shutter speed of 1/30s (of curse I was using a tripod). With that really selective metering I obtain a really bright color of the flower. Maybe a little bit too bright.

Partial metering

The camera chose a shutter speed of 1/40s. It is a little bit less bright than the spot metering and I think I am almost right in the color rendering.

Center-weighted average metering

The camera chose a shutter speed of 1/160s. As the brightness of the light (background) is taken into account, my flower has got this not so useful dark-gray colour.

Evaluative metering

The camera chose a shutter speed of 1/200s. Even worse than the previous one but I could say closer to the black silhouette than the previous one (it always depends on the result you want to achieve).

And now just for the fun I used the spot metering with the measure button (the button with a star !!) not on the flower but on the lamp.

I have almost my black silhouette.. Okay the background is not so romantic… But I am sure that with a white balance correction the result would have been a little bit better.

I hope this examples could help you to understand the differences between the metering modes.
I just wrote a few sentences above about the measure button, the button with the star. This button is really, really, really useful. In Av and Tv mode you could use it like that: point at the subject you want bright, press the star button, then you’ve got a few seconds to recompose your pictures and focus. The exposure has been set up by the cam (really useful with back light conditions or for photographing details). In M mode it also helps, the only thing is that you have to set up your aperture, shutter speed and iso and then control your exposure with the star button.

A small conclusion and some tips:
– know your light-meter, choose a a metering mode, e.g. the basic one and play with the exposure in M mode with different configurations. Let the cursor be in the middle, then at +1 then at -1 and compare the results.
– A zone over exposed (too bright) as also a zone under exposed are zones where information is lost. That is why you have to think about what is important to you. I’ll explain this with these too pictures which are the same picture but one is the jpeg direct from the DSLR and the other the post-production picture after using Lightroom.

Back light situation with beautiful sunset on the beach. The two subjects are important but the beach and the sunset color too. That is why I had to find a small in between in order to not lose too much information.

Have fun with light.
So this is it, it want to start with you a new category of posts about Photography. Why? Not that I consider me as a « photographer » but I noticed that a lot of people do have a DSLR but do not really understand what are the difference between the settings and modes and are just stuck in the automatic modes (and sometimes are just using the full automatic modes).
I must admit that once upon a time I was one on those people. I loved taking pictures so much that a good friend of mine offered me his old 350d. I was quite « proud » to eventually have a « big » gun and thought that was it… It was just wrong, it was just the beginning of a long journey. I learned a lot, am still learning and I want to share with you my small understanding of this world known as « Photography ».

Enough small talk for today. Let us start.
I called these post « Play with light » because I think that it is the essence of photography. Photography does literary means « write with light » or « paint with light ». You’re writing a story using as « ink » light and as « pen and book » your DSLR.

Let us talk about your « pen » and your « book ». Your DSLR is made basically of two parts : the body and the lens. With the lens you can decide how you want to see the external world, and the body, thanks the sensor, will record the picture.
The choice of the body and the lens really depends on the result you want to achieve but I will reserve that discussion for another post. I want to write in that very first post about the amount of light that you want to record. This amount of light is called « exposure« . The good thing with a DSLR is that you have a lot of possibilities to play with the exposure.

You will then define your exposure with 3 parameters: aperture, shutter speed, iso (in M mode you will have to define these 3 parameters).

– Aperture (of f-number) determines the size of the opening of your lens thanks a diaphragm. This will also determines your depth-of-field (what it sharp or not in your picture). A small aperture (like f2.8) corresponds to a big opening and gives you a short depth-of-field in order to detach your subject. A big aperture (like f11 or very big like f16 or f22) corresponds to a small opening and gives you a long depth-of-field to have at the limit case everything sharp on your picture. Of curse what I am saying does have its limits for instance when you are dealing with macro-photography or telephotography. With the Av-mode you will only have to define the aperture and the iso.

– Shutter speed determines the length of time you are exposing your sensor with light. With the shutter speed you can decide what kind of « motion » you want to record. You want to freeze it or smooth it. Long shutter time will require a tripod. With the Tv-mode you will only have to define the shutter speed and the iso.

– Iso determines the sensibility of your sensor. Do you remember the film with 100iso or 400iso? A high iso will corresponds to a high sensibility. Unfortunately a high iso delivers also a « lot » of noise which will then denature your pictures by adding e.g. a lot of « grain ».

I could also speak about the white balance now but I reserve it also for another post.

Now let us set up our 3 parameters in order to obtain a correct exposure. I use the word correct because the right exposure will depend on the effect that you want to reach. To judge your exposure you can use a light-meter. In your DSLR, the light-meter is that small cursor that that moves on a scale (most of the time « -2..-1..0..+1..+2 »). A correct exposure will be obtained when the cursor is in the middle (some tricks about the light-meter will follow in another post).

So, let us see some pictures. I tried in that pictures to let you see the effect of the aperture by trying to maintain a constant exposure. This is where the strange word of stops plays a role.
It is in fact simple : change for a next higher stop and you are dividing the amount of light by two. You can e.g. increase the aperture (which reduces the opening of the lens e.g. f2.8 -> f4.0), decrease the shutter speed (1/125 -> 1/250) or reduce the iso (400 iso -> 200 iso).

I set up the iso to 400. I changed then the aperture and adapted my shutter speed to reach the « correct » exposure.

That was it for a small preview. Here some reminders and some tips:
– exposure = aperture + shutter speed + iso
– small aperture= detached subject e.g. f2.0
– small shutter time, freeze the subject e.g. 1/500s
– high iso = lot of noise, try to work with the smallest iso possible.
– without tripod is 1/60s a decent limit (without sensor stabilizer)

This post is not perfect but I hope it helped a bit. Please correct, comment, ask…

F A C E B O O K
F O L L O W